Wondering how to start an ecommerce business without a huge budget or fancy setup? The good news! You don’t need a warehouse, a big team, or loads of money to get going.
These days, a laptop, Wi-Fi, and a bit of focus are enough to launch. That’s exactly how many top ecommerce brands began. Even if you're making your own products or reselling, this guide covers it all, from choosing what to sell to setting up your store, pricing, and shipping.
Remember 🧠: You don’t have to spend big to start. Plenty of ecommerce founders began with what they had and grew step by step.
Key Takeaways
- Startup costs range from $500 to $2,000, but can reach $5,000–$20,000 with inventory, marketing, and a website.
- Your product and business model (e.g., dropshipping, digital, POD) directly impact your startup speed and scalability.
- Profitability depends on smart pricing, which includes costs like shipping, platform fees, and ads.
- This blog walks you through every step, from product selection to launch, pricing, fulfillment, and growth.
Let’s start with the initial and important choice: What to offer.
Step 1: Select what to sell
A great product can make your brand stand out, attract loyal customers, and drive consistent sales. So, it’s important to sell something with real demand and potential.
There are two main paths here:
- Create your own product – This could be handmade goods, a digital download (like a template or course), or a tool/software you’ve built. Great for control and branding, but takes more time and effort.
- Sell existing products – You can go with wholesale, dropshipping, or print-on-demand. It’s faster to get started, but margins can be thin, and you rely on others for quality and shipping. As order volume increases, many sellers move toward wholesale distribution to reduce per-unit costs and simplify sourcing.
Now, how do you know if your idea will work?
Start by checking if people are actually searching for it. Use tools like:
- Google Trends – Shows how interest is changing over time
- TikTok Search – Great for spotting trending products
- Amazon Best Sellers and Etsy – See what’s already selling
- Ubersuggest or Keyword Planner – Check monthly search volume
Also, ask yourself: Would you buy this? Are others asking about it online? If there’s no buzz, rethink. Don’t fall in with your idea until you’ve checked that there is real demand.
Step 2: Define your e-commerce model
The model you choose impacts your budget, launch speed, and control over quality and shipping. Get this clear before naming your brand or building a site.
Here are a few common e-commerce business models:
| Model | How It Works | Pros | Cons |
|---|---|---|---|
| Own Inventory | You buy, store, and ship products yourself. | Full control over quality and shipping. | Higher upfront costs, storage space needed. |
| Dropshipping | No inventory. You list items, and a supplier ships them when ordered. | Low startup costs, easy to begin. | Less control over quality and delivery. |
| Print-on-Demand | Supplier prints and ships custom designs (like shirts or mugs) after each sale. | Great for creatives, no inventory. | Lower margins, limited product selection. |
| Digital Goods | Sell downloadable items like ebooks, courses, or templates. | No shipping or storage costs. | Needs strong marketing to stand out. |
| Other Models | Subscription boxes, affiliate stores, or combining digital and physical products in one shop. | Flexible, creative options to expand. | More setup time, requires careful planning. |
To figure out what fits:
- Got time but no money? Dropshipping might work.
- Have skills and want full control? Go with inventory or digital.
- Want to test fast? Print-on-demand is a good middle ground.
Remember: There’s no perfect model. Just choose what lines up with your budget, comfort level, and goals. You can always adjust later.
Step 3: Understand the market
Even small stores need to know their audience and competition. Market research just means getting the basics right before investing time or money.
The better you know your customer, the easier it is to build a product and brand they’ll actually care about.
Think about things like:
- Age group – Are they teens, parents, young professionals, or retirees?
- Lifestyle and interests – What do they enjoy or spend time on?
- Spending habits – Do they look for deals or pay more for quality?
- Issues – What do they aim to resolve or enhance?
- Buying patterns – Do they frequently shop online?
Look at other businesses selling similar products. Check their prices, marketing, and customer reviews. Pay attention to what they’re missing, like faster shipping, better quality, or stronger customer support, and think about how you can do it better.
You can use simple tools to get started. Google, Amazon, Etsy, TikTok, and Reddit, even competitor reviews, can tell you a lot. Look for price ranges, popular keywords, and what’s trending right now.
Step 4: Create your e-commerce business plan
You’ve got the idea, now tie it together with a simple plan. No fluff, just a clear path to help you stay focused and grow your business.
Here’s what to include:
- Product details – What you’re selling and why it stands out
- Target audience – Who your customers are and how they shop
- Pricing strategy – Will you go premium, affordable, or somewhere in between?
- Supplier and fulfillment model – Dropshipping, in-house, POD, etc.
- Sales channels – Your own site, marketplaces, or both
- Marketing plan – Think SEO, email, social media, influencer shoutouts
Why bother with this? Having a clear plan cuts down on trial-and-error. It helps you budget better, track progress, and grow without scrambling later. Even if it’s just a one-pager in Google Docs, it’s worth it.
Get Your Business Plan Ready In Minutes
Answer a few questions, and AI will generate a detailed business plan.
Step 5: Choose where to sell: Your store or a marketplace
With your product and plan finalized, the next major question is: where will you market it? You have two primary choices (and indeed, you can use both):
- Your own site – Platforms like Shopify, Wix, or WooCommerce
- Online marketplaces – Amazon, Etsy, eBay, etc.
Selling on your own site gives you full control over branding, pricing, and customer experience. You can build a stronger brand and own your customer list. But it takes more work on the marketing side as well to build that traffic. A growing number of store owners are taking this further by building a multi-vendor marketplace — bringing multiple sellers under one storefront to expand their product catalogue, share fulfilment, and grow faster without holding inventory themselves.
Online marketplaces like Amazon and Etsy give you instant access to buyers and built-in trust. But expect higher fees, more competition, and less control.
So…… what’s the move?
- If you want to test fast with low risk, start on a marketplace.
- If you're serious about building a long-term brand, invest in your own store.
- Or do both. Use marketplaces to get traffic and your own store to build loyalty.
Step 6: Name your store and register your business
Your business name matters. It’s your identity, your vibe, and the first thing customers see. Keep it short, relevant, and easy to say and spell.
Pick a name that fits your vibe and product. Keep it short, unique, easy to spell, and easy to remember.
Here’s a simple name checklist:
- Is it clear and simple?
- Does it hint at what you sell or who it’s for?
- Is the .com domain available?
- Can you grab the same name on Instagram, TikTok, etc.?
Once you’ve picked a name, it’s time to register it. Here are the basics to get registered (especially if you’re in the U.S.):
- Choose a business structure (e.g., LLC).
- Register your business name with your state or local government, and register your domain name if you haven't already.
- Get an EIN (Employer Identification Number) from the IRS; it’s free and useful for taxes and opening a business bank account.
- Apply for licenses or permits (if needed).
- Check if you need a sales tax ID; some states require it even for online sales.
Also worth thinking about:
- Trademark – If you’ve got a unique name or logo, protect it
- Insurance – Optional at first, but smart if you’re dealing with inventory or employees
- International sales – If you're planning to sell in countries outside the U.S., familiarize yourself with VAT compliance requirements early on, as they vary by location
Step 7: Establish your online shop
This is where it gets real: you’re building your actual store. Whether it’s Shopify, Wix, or another ecommerce platform, setup can take just a weekend or two with focused effort.
Here’s what to do:
- Pick a clean, mobile-friendly theme – Avoid anything clunky or outdated in style
- Add must-have pages – Product, checkout, About Us, FAQ, Contact, and a clear return policy
- Upload products – Use good lighting for photos (your phone is enough). Write clear, benefit-focused descriptions. Price each item based on cost, margin, and market rates.
- Customize the flow – Tweak the navigation bar, check mobile layout, and make sure your e-commerce payment processing works smoothly
- Legal stuff – Add a privacy policy, terms and conditions, and cookie notice if needed
Before launch, test it all. Ask a friend to go through the site like a customer. If they get confused at any point, fix it.
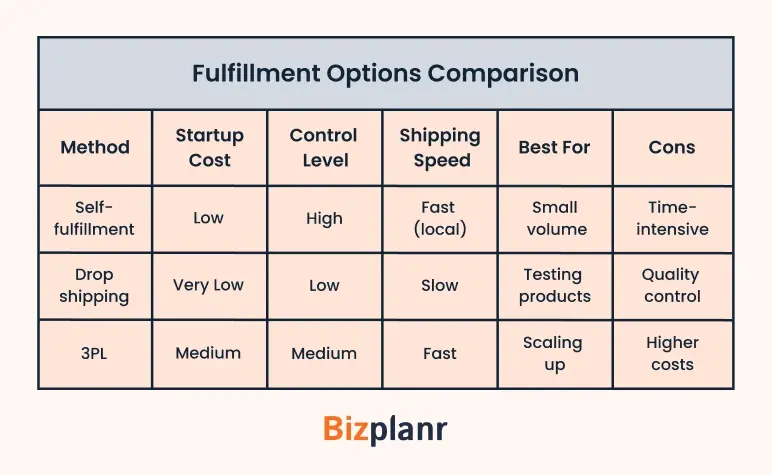
Step 8: Choose a fulfillment approach
After someone clicks “Buy,” you need to get the product to their doorstep. That’s where fulfillment comes in. How you handle this step affects shipping time, quality, and your customer's whole experience.
Here are the three main ways to do it:
- Self-fulfillment: You store, pack, and ship orders yourself. This gives full control and can be cheap at first, but it’s time-consuming and harder to scale.
- Dropshipping: You don’t hold any stock. Your supplier ships products directly to customers. Easiest to start, but slower delivery and less quality control.
- 3PL (Third-party logistics): You send inventory to a warehouse. They pack and ship orders for you. It costs more, but it's faster and saves you time once orders grow.
How to pick the right one:
- Starting lean? Try dropshipping.
- Want faster delivery and better packaging? Go with 3PL if your margins can handle it.
- Like hands-on control? Stick with self-fulfillment (at least early on).
Always test before committing. Place trial orders to check delivery time, packaging, and the customer experience. Also, keep an eye on shipment exceptions, so you can quickly handle delays or errors and keep customers happy.
Step 9: Price your products right
Pricing isn’t just “cost + markup.” It has to cover everything you spend, leave room for profit, and still make sense to customers.
Here’s what to include in your price:
- Cost of goods sold (COGS) – what you pay for the product
- Platform fees – Shopify, Stripe, PayPal, etc.
- Shipping and packaging
- Average ad spend per sale
- Your target profit margin
A basic formula:
Selling Price = (COGS + shipping + platform fees + average ad spend) ÷ (1 − desired margin %)
Example:
Let’s say your product costs:
- COGS: $10
- Shipping & packaging: $4
- Platform & payment fees: $2
- Average ad spend per sale: $4
- Desired margin: 40% (0.40)
The overall expense amounts to $20. Insert that into the equation:
Selling Price = $20 ÷ (1 − 0.40) = $20 ÷ 0.60 = $33.33 → That’s your minimum price.
Aim for at least a 30–40% margin after all costs. That gives you room for discounts, returns, or any other disruptions.
And don’t set it and forget it. Revisit pricing regularly. As you grow, you might get cheaper rates on supplies or find ways to offer bundles and upsells.
Step 10: Launch your store (with marketing basics in place)
Your store’s almost ready, but before going live, run through this quick pre-launch checklist:
- Test the entire checkout flow
- Check mobile responsiveness
- Make sure order emails are being sent
- Add key legal pages: Returns, Contact, Privacy Policy
Once the basics are in place, it’s time to choose your marketing starting points. Stick to just one or two channels at first; trying to do too much will only slow you down.
Start with what fits your audience: Instagram, TikTok, influencer gifting, or small-budget ads on Meta or Google.
| Channel | When to Choose It |
|---|---|
| Social Media | Great for visual products and younger audiences |
| Influencer Gifting | Ideal if you're building a lifestyle brand |
| Meta or Google Ads | Works well for tested products with clear demand |
| SEO & Blogging | Best for niches with strong search interest |
Set up tools early like GA4, Shopify Analytics, and email platforms to track growth, capture leads, and stay connected with your audience.
Adding live chat (such as Tidio or Crisp) can enhance customer support, and heatmap tools like Hotjar or Microsoft Clarity (optional) provide insight into how visitors interact with your site.
At last, focus on getting the basics right: a reliable shopping experience, clear value, and consistent outreach.
Step 11: Track, test, and grow
With your store now operational, growth relies on focusing on the right data and implementing smart changes.
Here are the key metrics to look for:
- Conversion rate – % of visitors who buy. A low rate means it's time to revisit your site.
- Traffic sources – Where your visitors come from (ads, social, search, etc.).
- Average order value (AOV) – The average $ spent per order.
- ROAS (Return on Ad Spend) – How much you make for every $1 spent on ads.
- Repeat purchase rate – % of customers who buy again. Loyal customers = long-term profit.
Start small with testing. Change one thing at a time:
- Try new product photos or layouts
- Adjust pricing or shipping offers
- Tweak ad creatives or landing pages
Listen closely to your customers. Early feedback, good or bad, is gold. Use it to improve fast.
Once your key metrics, like conversion rate and ROAS, are strong, it’s time to grow. You can boost ad spend, expand your product line, or test new channels.
Ready to take the next step?
Use Bizplanr to map your business strategy and stay on track.
Final thoughts
You’ve covered the major steps, from picking a product to launching and growing. Ideas are great, but action is better. Write your plan down and take the first step.
You don’t have to start from scratch, either. With a tool like Bizplanr, you can easily build a clear, professional business plan and get started with confidence.
So yeah, the first click, the first order, the first “thank you”—they’re all proof that your idea matters. Stay curious, stay kind, and trust your process. You’re doing something incredible.
Frequently Asked Questions
How much does it cost to start an ecommerce business?
You can begin with an investment of $100-$500, which will cover essentials such as a website, domain, and sample products. If you're purchasing stock or bringing on assistance, spending between $1,000-$3,000 or higher, based on your specific niche.
Do I need to register my business before launching?
Not necessarily. You can start as a sole proprietor, especially if selling under your own name. But if you're using a brand name or want legal protection, registering early is smart; it also makes things easier with payments and banking.
Which platform is better for ecommerce beginners: Shopify or Amazon?
Shopify gives you full control and is great for building your own brand. Amazon offers instant traffic but has more rules. For most beginners, Shopify is a better long-term play.
You can try a mix of both: Amazon for volume, Shopify for brand-building.
How do I choose the right product to sell online?
Go with something you care about or understand well. Ask yourself:
- Does it solve a real problem or make life easier?
- Are people already searching or buying similar stuff?
- Can I offer something better, cheaper, or different?
- Will the margins leave room for profit after costs?
Test 1 or 2 products, see what clicks, then build from there.
How long does it take to start making money from ecommerce?
You might get a few sales early on, especially if you have a launch plan or an existing audience. But a steady income usually takes 3 to 6 months of learning and adjusting.
Don’t stress early on, focus on small wins, and keep building.


Follow Bizplanr Team