Got a sketchbook full of ideas or a killer eye for style? Then you probably have the skill to start your brand, and you’re in the right place to learn how.
Learning how to start a clothing line isn’t just for big-name designers anymore. These days, you can launch with just a few great pieces, a clear story behind your style, and the right plan to back it up.
This guide breaks it all down from finding your niche to designing, sourcing, and selling. Ready?
Let’s go.
Key Takeaways
- Startup costs range from $500 to $10,000, depending on your model and production scale.
- Defining a clear niche and customer identity is crucial to stand out in a crowded market.
- Start with 3–6 quality pieces, test demand, and gather feedback before scaling.
- This guide walks you through every step, from design to launch and marketing.
Step 1: Choose your clothing niche and define your brand
Before anything else, get clear on who you’re designing for. “Cool streetwear” or “sustainable basics” sounds nice, but they’re too broad. Try to answer this: What kind of lifestyle does your customer live, and how does your clothing line fit into that?
Are you creating activewear for gender-neutral gym-goers? Afro-futurist looks for festival crowds? Relaxed workwear for creatives who hate suits? Get specific. That’s how you attract the right people and stand out in a crowded space.
Here’s how to sharpen your niche:
- Spend time on Reddit threads like r/streetwear, r/femalefashionadvice, or r/malefashionadvice
- Browse Etsy and look at what top sellers are offering
- Check Instagram hashtags for styles you like and see what gets engagement
A clear niche helps you design better, price smarter, and market more effectively. When you know exactly who you’re creating for, everything else falls into place.
Step 2: Write your clothing line business plan
If you’re serious about launching your clothing line, a clear business plan is essential. It doesn’t need to be overly formal, but it should capture all your ideas in one place.
Start by outlining the basics of your launch. This includes your initial product range, target customers, sales channels, estimated costs, pricing strategy, and what makes your brand stand out.
If you want to go deeper, your entire clothing line business plan can cover sections such as:
- Executive summary
- Company overview
- Market research
- Product line and design details
- Production and operations plan
- Marketing and sales strategy
- Financial projections
Spending time on your plan now helps you in the long run. It makes you think ahead and manage your budget better. A clear plan also shows investors or partners that you’re serious about building the business.
Build your clothing line business plan in minutes
Answer a few questions, and get a complete plan read.
Step 3: Understand your startup costs
The cost to start a clothing line varies based on your model, print-on-demand, small-batch, or custom manufacturing, but some expenses are common across the board.
Here’s a realistic cost breakdown:
| Expense Category | Estimated Cost (Range) | Notes |
|---|---|---|
| Sampling & Prototyping | $100 – $500 per design | Includes creating first samples or mockups |
| Logo & Brand Identity | $0 – $500 | Free with Canva or pay a designer on Fiverr/Upwork |
| Domain & Website Setup | $50 – $200 upfront + $30-$40/month | Shopify plan + domain registration |
| Product Photography | $0 – $300 | DIY or hire a freelance photographer |
| Marketing & Launch Ads | $100 – $500 | Paid ads, influencer outreach, giveaways |
| Tech Pack or Design Files | $0 – $300 per design | Needed if working with manufacturers |
| Inventory/Print-on-Demand and Setup | $0 – $2,000+ | POD is free to start; bulk inventory costs vary by quantity |
| Packaging & Labels | $50 – $300 | Poly mailers, tags, stickers, thank-you notes |
| Business Registration & Legal | $50 – $500 | LLC setup, EIN, resale certificate |
| Tools & Software (Optional) | $0 – $100/month | Canva Pro, Klaviyo, editing tools, etc. |
Estimated total to start:
- Lean model (POD or preorders): $500 – $1,200
- Inventory-based model: $1,500 – $5,000+
A few notes:
- Print-on-demand (POD): You won’t need to pay for inventory upfront. Tools like Printful or Printify only charge when you get an order.
- Preorders: You design first, promote on social, and only make what’s already paid for. Super lean and very beginner-friendly.
- Inventory production: Costs increase if you want control over fabric, sizing, or finishing. That’s where small-batch or cut-and-sew makes sense—but budget accordingly.
No matter your budget, start with just enough to test demand. Invest in what people want to buy, not just what looks good on launch day.
Step 4: Design your first collection
Your first collection doesn’t need to be a massive 20-piece catalog. Starting with 3-6 strong, well-thought-out pieces is more than enough. The goal isn’t variety, it’s clarity.
Start with a clear story, as your first collection should say something about your brand. Is it soft loungewear for remote workers? Statement streetwear? Sustainable basics for everyday wear? Every item should tie back to that idea.
Ask yourself:
- Do these pieces feel like they belong together?
- Would someone want to wear multiple pieces from the same drop?
- Can someone “get” the vibe of my brand by looking at just these items?
Think of it like a capsule: Simple, cohesive, and easy to understand.
How to get your designs ready?
You don’t need to be a fashion illustrator. Start with pencil sketches or use tools like Canva, Sketchbook, or Procreate. If you’re serious about manufacturing, you’ll need tech packs later, which are detailed files with fabric info, stitching types, and measurements.
You can make your own using templates or hire freelancers from Fiverr or Upwork to handle that part.
If you're working with a manufacturer, tech packs help avoid mistakes. If you’re going print-on-demand, most platforms have built-in design tools.
Don’t skip sampling!
Before you hit "launch," make a physical version of each piece. You’ll want to check:
- Fit (too tight? too boxy?)
- Fabric feel (soft? breathable?)
- Print or embroidery quality
Try them on. Wash them. Ask friends to wear them and review them. You’re not just designing clothes, you’re building trust. People can’t touch your product online, so every detail counts.
Once your collection looks and feels solid, you’re ready to move forward.
Step 5: Handle the legal side of your brand
Once your collection is ready, make your business official. This part isn’t the most exciting, but skipping it can create big headaches later. Start by picking a business name carefully.
Before settling on anything, check that it’s available across:
- Domain names (use tools like Namecheap or GoDaddy)
- Social media handles
- Your state’s business registry to avoid name conflicts
If everything’s available, lock it in. Buy the domain, claim the social media handles, and you’re good to move forward.
Next, register your business. For most small brands, an LLC (Limited Liability Company) is the easiest and safest choice. It keeps your personal and business finances separate, which matters if anything goes wrong.
You can register through your state’s website or use services like LegalZoom or ZenBusiness to simplify the process.
Once you’re registered, ensure you also:
- Get an EIN (Employer Identification Number) from the IRS (needed for taxes and opening a business bank account)
- Open a business bank account to keep your finances clean
- Consider a resale certificate if you plan to buy materials wholesale without paying sales tax upfront
You might also want to think about trademarking your brand name. You don’t have to do this on day one, but if you plan to grow or worry about copycats, it’s smart to look into it early. The process takes time and money, so many brands wait until sales are steady before investing in it.
And one last note on safety: If you’re selling anything worn on the skin, especially jewelry with metal parts, check local safety laws or labeling requirements. This is especially important for kids’ products.
Taking these steps now gives your business a solid foundation and helps avoid costly problems later on.
Step 6: Choose a manufacturing or production model
You don’t need to be a production expert; you just need to pick a model that fits your current stage, budget, and goals.
Let’s break down your three main options:
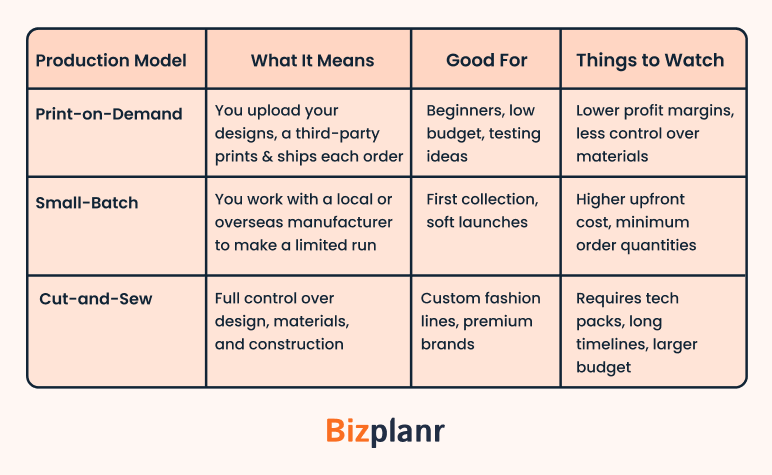
So… how to decide your production model?
- Low budget & fast test? Go with print-on-demand (like Printful or Printify).
- Want control but starting small? Try small-batch production with a local manufacturer.
- Have a solid budget & clear vision? Cut-and-sew gives full control, but it’s slower and more costly.
To find your production partner:
- Browse Maker’s Row, Indie Source, or Sewport for vetted manufacturers.
- Post a job on Upwork or Fiverr for help creating tech packs.
- If possible, start with someone local; you’ll learn more, faster.
Step 7: Build your brand identity
Now shape how people see you and feel about your brand. It’s the full impression you leave from colors and fonts to how you write captions and pack your orders.
Why does this matter? Because approximately 80% of consumers need to trust a brand before they even consider buying from it. Trust starts with consistency, clarity, and a brand that feels real and reliable.
Start with the basics:
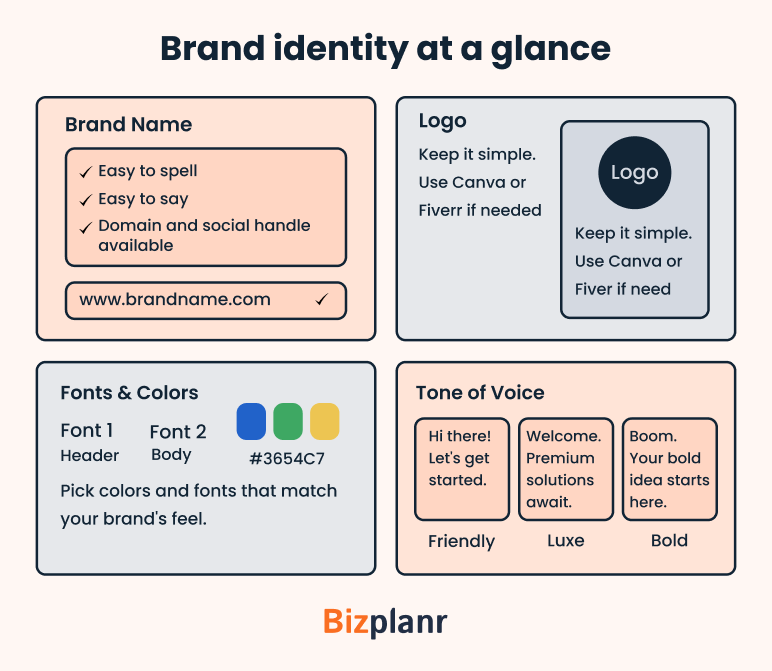
Then think about the physical and digital touchpoints:
- Packaging: Even a sticker and thank-you card go a long way. Is your brand eco-conscious? Use smart packaging options, such as recyclable materials or minimal designs.
- Product tags: If you’re sending inventory, ensure it carries your brand—hang tags, labels, or even just branded tissue paper.
And since clothing is visual, your online presence matters a lot. Instagram, TikTok, and Pinterest are powerful tools, so make your visuals scroll-stopping. Even with a small budget, good photos and consistent vibes can set you apart.
Step 8: Create your website and start selling
This is your shop window. Whether you’re going all-in with Shopify or starting with Etsy, your website needs to feel trustworthy, easy to use, and built for shoppers, not just pretty.
Platform options:
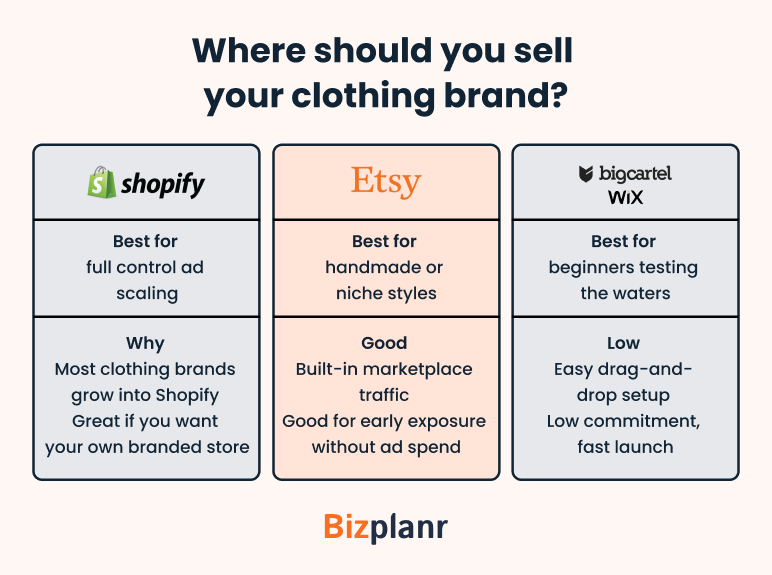
So, what should your site include?
Start with strong product photos, front, back, close-ups, and real people wearing your pieces. Add a clear size chart to reduce returns, and write honest, helpful descriptions with details on material, fit, and care.
Make checkout smooth (Shopify nails this), and optimize for mobile, as most shoppers use their phones. Include shipping and return policies to build trust.
Before going live, do a soft launch. Share the link with a few friends or early supporters to fix issues before your public debut.
Step 9: Promote your launch and grow your audience
Now it’s time to get people to actually notice you. Start with free, content-focused strategies for your brand:
- Share behind-the-scenes clips on TikTok or Instagram to build trust.
- Post-transformation videos show the idea of the final product.
- Tell your founder's story, people buy from people.
- Run pre-launch giveaways for early access or discounts in exchange for follows or emails.
Use a simple pop-up on your website (Mailchimp or Klaviyo works well) to collect emails. Offer a small perk like “10% off your first order” or “early access to limited drops” to encourage signups.
Don’t forget about working with small creators. Reach out to 5–10 micro-influencers whose style matches your brand. Offer free pieces or affiliate codes. Instead of chasing huge followings, look for genuine engagement and authenticity.
Above all, remember this phase isn’t about pushing hard for sales. It’s about building a community of people who want to see you win and will spread the word for you.
Step 10: Track your results and plan for growth
Once those first orders start coming in, it’s time to see what’s working and what needs to change. Tracking your results helps you make smart decisions instead of guessing.
Start with basic tracking. Use Shopify Analytics or Etsy’s built-in stats to see which products are selling best, where your traffic is coming from (Instagram, Google, direct visits), and which pages people leave on.
This data helps you figure out what to double down on. If you haven’t already, set up Google Analytics. It’s free and gives you even deeper insight into how visitors behave on your site.
Feedback is just as important. Ask customers what they think after they buy. You don’t need anything fancy:
- Send a simple post-purchase survey with Typeform or Google Forms
- Ask questions like: Did the product meet expectations? Was the sizing right? What would you change?
Real feedback is gold. It helps you improve product descriptions, adjust pricing, or even redesign your pieces to better match what people want.
Then think about how to grow in ways that build on what’s working:
- Add a second collection based on your best-sellers
- Partner with local boutiques or small shops
- Offer wholesale if retailers show interest
- Host pop-ups or small events to meet customers face-to-face
Don’t feel pressured to do everything at once. Growth isn’t about chasing every new platform or trend. The best brands evolve by listening, learning, and refining what’s already working well.
5 Common Startup Mistakes in Clothing Businesses
Even the best ideas can stumble early. Here are common mistakes new clothing brands make and what to do instead:
1. Launching without a business plan
You don’t need a 50-page doc, but skipping planning is risky. Write down your goals, costs, audience, and how you’ll sell. It keeps you focused when things get off track.
2. Designing too many pieces at once
More products don’t mean more sales. Start with 3–6 solid items. Learn what people want, then build out.
3. Underestimating production timelines
Everything takes longer than expected, especially sampling and manufacturing. Always add buffer time. Launching late is better than launching half-done.
4. Pricing based on emotion
Don’t set prices just to “seem affordable.” You need to cover materials, time, and profit. Use real math, not guesswork.
5. Thinking that good design alone drives sales
Great pieces are a start, but so is visibility, trust, and brand vibe. Marketing matters just as much as design.
Final thoughts
Starting a clothing line is a big step, but you don’t have to have it all figured out on day one. Whether you're designing from scratch or printing on blanks, what matters most is getting started and staying consistent.
And if you need help keeping things organized, Bizplanr can guide you through planning your business without the stress.
There will be trial and error; it’s part of the process. Keep learning, stay true to your style, and don’t be afraid to start small.
Get Your Business Plan Ready In Minutes
Answer a few questions, and AI will generate a detailed business plan.
Frequently Asked Questions
How much does it cost to start a clothing line?
You can start with as little as $400–$500 using print-on-demand, making it a great low-risk option for new brands.
But if you’re an established designer planning to manufacture and launch at scale, your startup costs can easily reach $25,000 to $50,000 or more.
Do I need fashion design experience to launch a clothing brand?
No. Many founders hire freelancers or use mockup tools like Canva or Printful. What matters most is knowing your audience and offering something they want.
What’s the best way to find a manufacturer for my clothing line?
Start small, try local seamstresses or small-batch production studios to test your first run. Platforms like Maker’s Row or Indie Source are great if you're U.S.-based. Also, ask other small brands or explore relevant Reddit threads or Facebook groups.
Should I use print-on-demand or manufacture inventory?
If your budget is tight or you want to test designs fast, print-on-demand is the safer bet. No inventory risk, but less control over materials. If you're confident about demand and want higher margins, go for small-batch production. Many founders use both models at different stages.


Follow Bizplanr Team